Managing External Access to Your Tenant
Allowing another organization's Tenant to access to your Audit Trails
Organization-Based Access Control (OBAC) policies allow you, as a tenant administrator, to share access to audit trails from your tenancy with an administrator of another tenant. This permissioned sharing allows you to grant access, whether read/write or read-only, to people outside of your organization.
OBAC policies have a lot in common with Attribute-Based Access Control (ABAC) policies; they apply the same controls with two different classes of actor. Where they differ is that OBAC only allows sharing between Tenant Administrators. The external Administrator must then apply an ABAC policy within their tenancy to give their own organization’s Non-Administrators access to your Audit Trails, where appropriate.
Note: To enable sharing of assets with those outside your tenancy, you must be an Administrator in your organization AND have completed an exchange of subject identifiers, as outlined below.
Adding External Organizations to Allow Sharing
In order to share Assets and their details with another organization or Tenancy, we must first import the subject ID of the external organization. The external organization will also need to import your subject ID. The process below shows how to enter an external organization’s subject ID and for obtaining your own subject ID.
Finding Your Own ID
As an Administrator, navigate to
Access Policies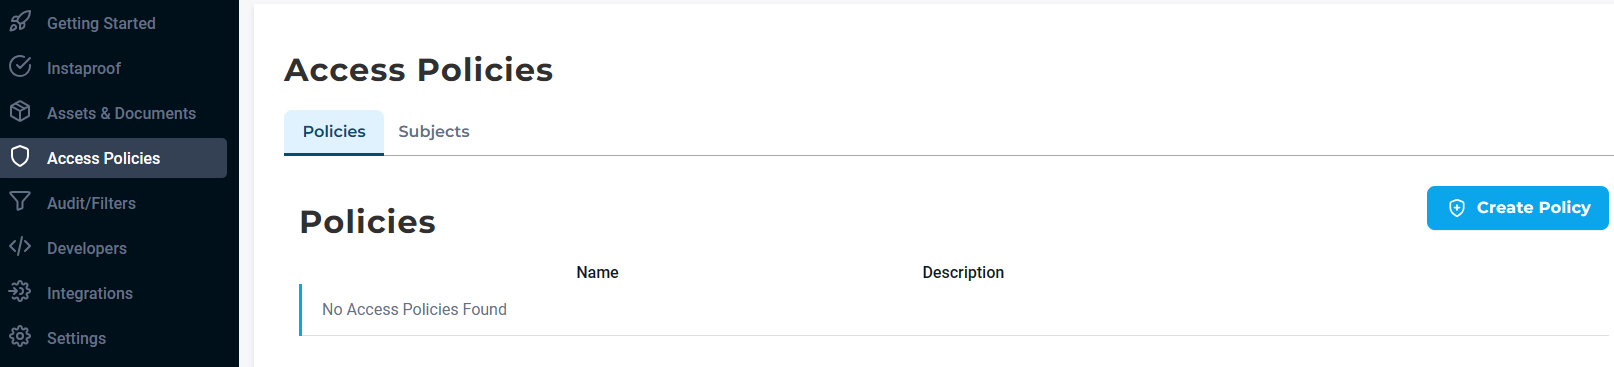
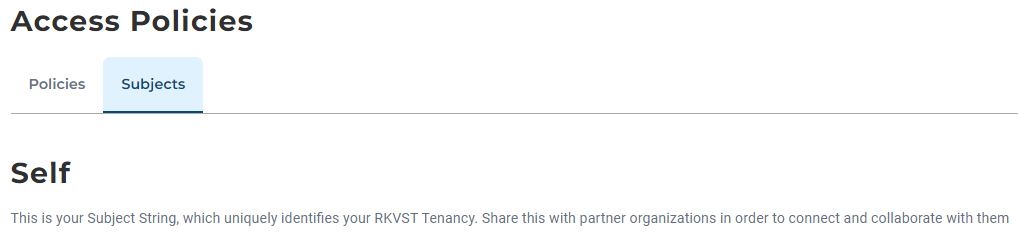
Managing Policies Select the Subjects Tab and your Organization’s ID will be contained within the
Selfbox.This string is the one you should share with the Administrator of the other tenancy.
Managing Policies

Importing another Organization’s ID
The external organization’s Administrator will send you their subject ID. Use this to create a new Subject.
As an Administrator, navigate to
Access Policies.Managing Policies In order to import a Subject using the base64 string, it will need to be decoded to access the
wallet_pub_keyandtessera_pub_keyused in the next stepecho $SUBJECT_STRING | base64 -dSelect the Subjects Tab and then
Import SubjectSelect the Subjects Tab and then
Import Subject.
Importing a Subject You will see a form. Enter the subject ID that was sent by the other organization’s Administrator into the
Subject Stringbox. TheNamebox is for you to label the imported organization with a friendly name.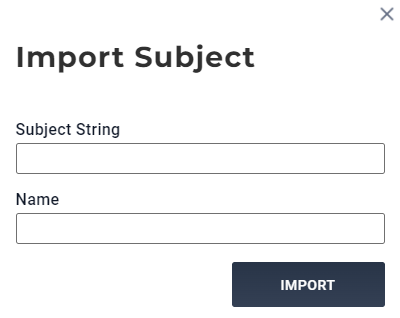
Adding the Subject To add users to the access policy using JSON, you will first need to retrieve their subject IDs using the IAM Subjects API.
Save the following to a JSON file with your desired subject information
{
    "display_name": "Friendly Name",
    "wallet_pub_key": ["key1"],
    "tessera_pub_key": ["key2"]
}
Execute the file, which will return the subject identity in the form
subjects/<subject-id>to be used in your Access Policy. See instructions for creating yourBEARER_TOKEN_FILEhere.curl -v -X POST \ -H "@$HOME/.datatrails/bearer-token.txt" \ -H "Content-type: application/json" \ -d "@/path/to/jsonfile" \ https://app.datatrails.ai/archivist/iam/v1/subjects
Note: The imported subjects will show a grey “disconnected” icon until both sides have imported the other’s Subject ID. This acknowledges that the organizations wish to share with each other. Once both organizations have accepted, the grey disconnected icon will no longer show.
Creating an OBAC Policy
OBAC creation uses many of the same steps, filters, controls, and forms as ABAC Policies.Note: Access polices are applied to the Asset. This means that when a policy is created or updated an Event will be recorded in the audit trail of matching Assets from the ActorArchivist Internal.
It is possible to mix-and-match ABAC and OBAC Permission Groups in the same policy if you so wish.
Create your Access Policy
Navigate to the
Access Policiessection on the sidebar of the DataTrails dashboard.Managing Policies Create an empty file, in later steps we will add the correct JSON.
{

}
You may wish to view your existing policies before creating a new one
Here you will see any existing policies and can select
Create Policy.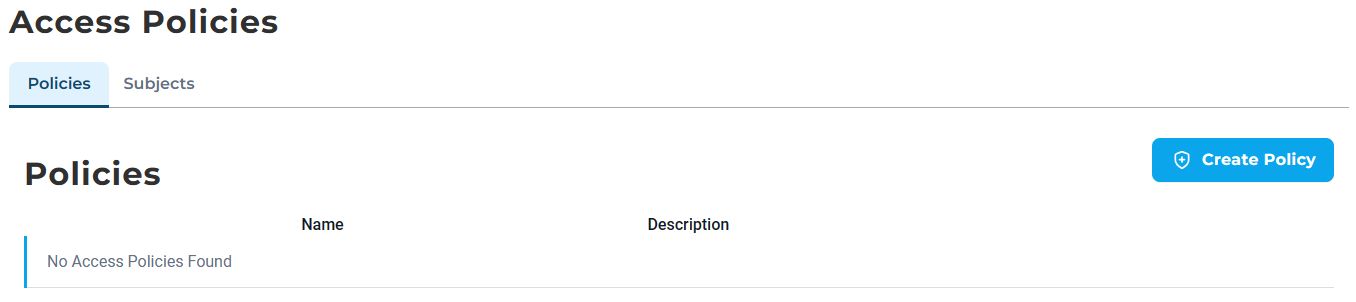
Creating a Policy You may view your existing policies before creating your new policy by executing the following curl command. See instructions for creating your
BEARER_TOKEN_FILEhere.curl -v -X GET \ -H "@$HOME/.datatrails/bearer-token.txt" \ https://app.datatrails.ai/archivist/iam/v1/access_policiesSet the asset filters for your policy
When adding a policy, you will see this form:
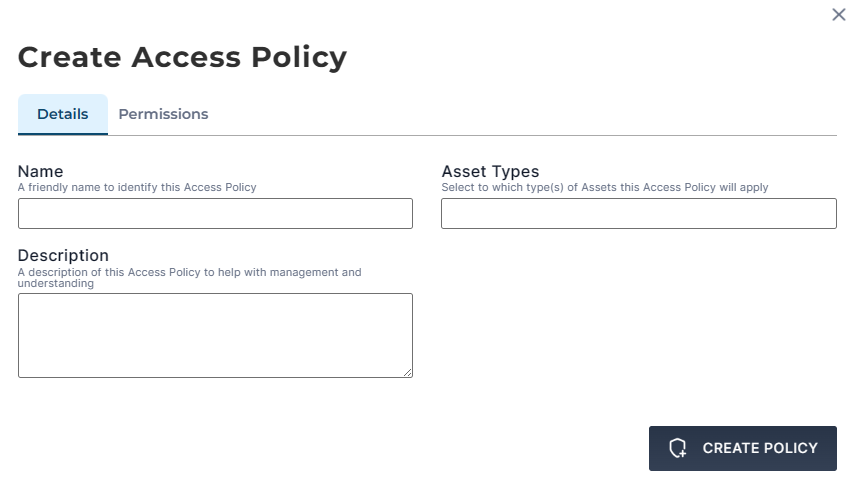
Policy Web Form Here you can apply policy filters to the correct Assets. In this case, we shall apply the policy to any Asset of the type
Shipping Container.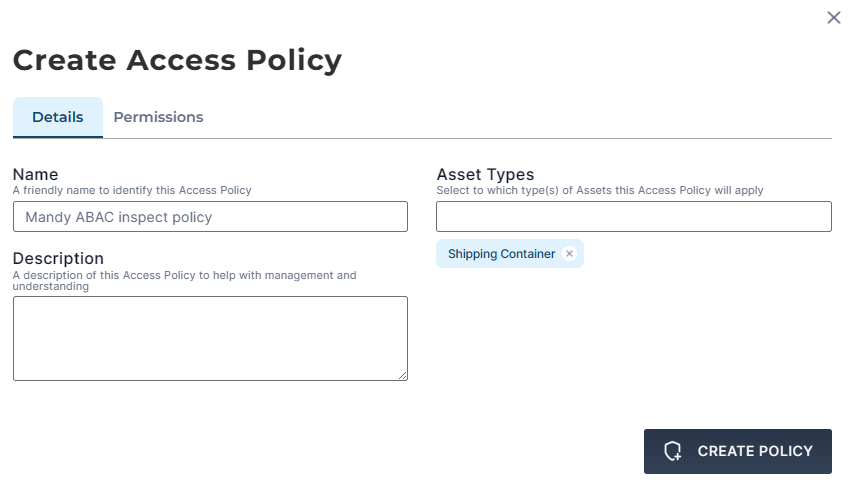
Filtering for specific Assets and Locations Filters can use
andororto categorize assets. You may also use filters on attribute values, such as=and!=for equal and not equal, respectively. These can be used for specific attribute values, or to check if the value exists at all. For example, to filter for Assets not associated with a location, you could use:"attributes.arc_home_location_identity!=*"The
*is a wildcard that could represent any value. This will match not only on string values, but list and map values as well.Following our Shipping Container example, this is how we would set our Asset filters:
{ "display_name": "Mandy Inspect Policy", "filters": [ { "or": [ "attributes.arc_home_location_identity=locations/<location-id>" ]}, { "or": [ "attributes.arc_display_type=Shipping Container" ]} ] }Next, enter the desired
Permissionsto set Users’ Asset and Event attribute accessWe select the
Permissionstab to set users’ Asset and Event attribute access policy.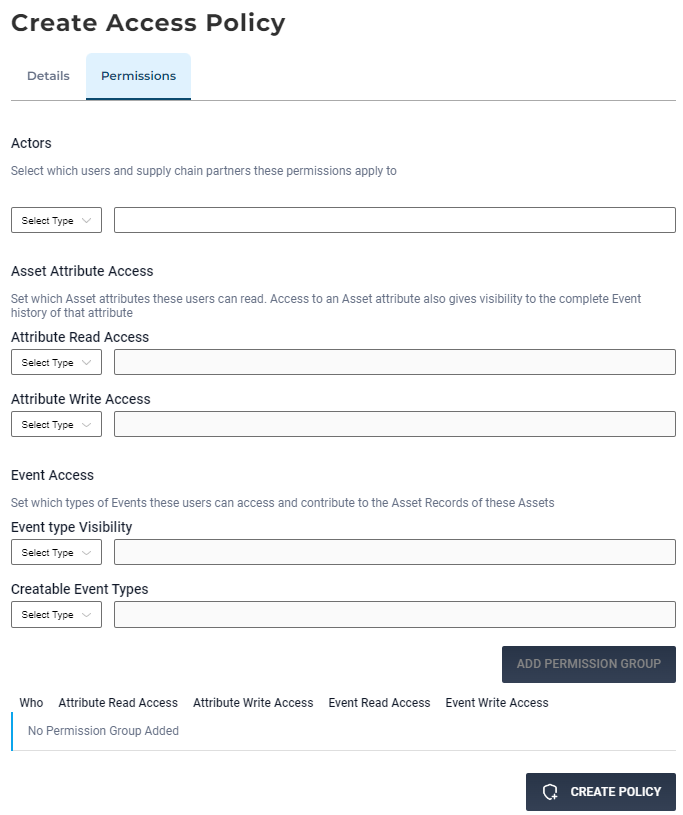
Default view of Policy Permissions In our case, we want the
Organizationactor, which implies OBAC. Type the friendly name of the organization you wish to share with into the box and there should be a pre-populated drop-down search.Note: You will need to have imported another Organization’s ID before you can specify a policy to share information with that Organization.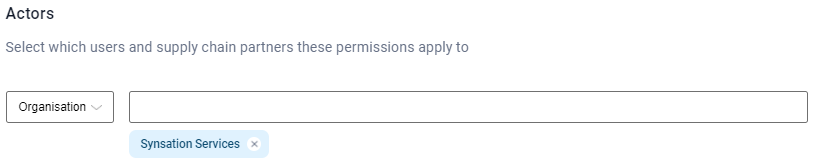
Adding a specific User to a Policy To add an organization to the access policy, you will first need to retrieve their Subject IDs using the IAM Subjects API.
Save the following to a JSON file with your desired subject information.
{
    "display_name": "Friendly name",
    "wallet_pub_key": ["key1"],
    "tessera_pub_key": ["key2"]
}
Execute the file, which will return the subject identity in the form
subjects/<subject-id>to be used in your access policy. See instructions for creating yourBEARER_TOKEN_FILEhere.curl -v -X POST \ -H "@$HOME/.datatrails/bearer-token.txt" \ -H "Content-type: application/json" \ -d "@/path/to/jsonfile" \ https://app.datatrails.ai/archivist/iam/v1/subjectsOnce all relevant details are complete, add the permission group to the policy. You may add multiple permission groups per policy if you wish
Enter desired permissions and select
Add Permission Group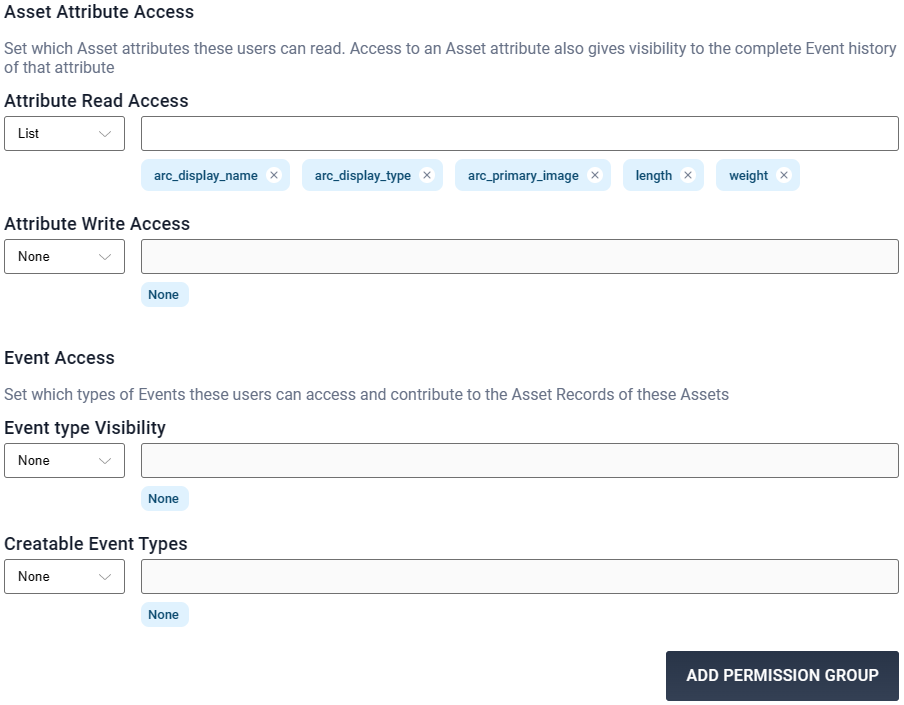
Permitted Attributes on an Asset Add the desired permissions and the Subject ID found in the previous step
{
    "display_name": "Mandy Inspect Policy",
    "filters": [
        { "or": [
            "attributes.arc_home_location_identity=locations/<location-id>"
        ]},
        { "or": [
            "attributes.arc_display_type=Shipping Container"
        ]}
    ],
    "access_permissions": [
        {
            "asset_attributes_read": ["weight", "length", "arc_display_name", "arc_display_type", "arc_primary_image"],
            "subjects": [
                "subjects/<subject-id>"
            ]
        }
    ]
}
Note we have included DataTrails-significant attributes:arc_display_name,arc_display_typeand arc_primary_image.arc_*attributes have special significance in DataTrails. In this case, respectively, allowing visibility to the Name and Type of the Asset. Otherarc_*attributes are also available.Once complete, finish creating the Access Policy
Select
Create Policy.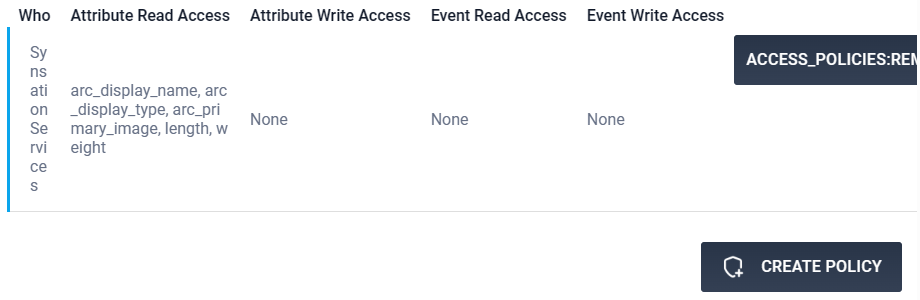
Submitting a Policy Use the curl command to run your JSON file! See instructions for creating your
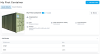
BEARER_TOKEN_FILEhere.curl -v -X POST \ -H "@$HOME/.datatrails/bearer-token.txt" \ -H "Content-type: application/json" \ -d "@/path/to/jsonfile" \ https://app.datatrails.ai/archivist/iam/v1/access_policiesOnce complete, check the Asset is shared appropriately; Mandy should only be able to see the
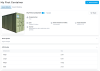
By comparison, our Administrator, Jill, can see the full details of the Asset:Name,Typeand anImageof the container as well as the Asset’s customweightandlengthattributes.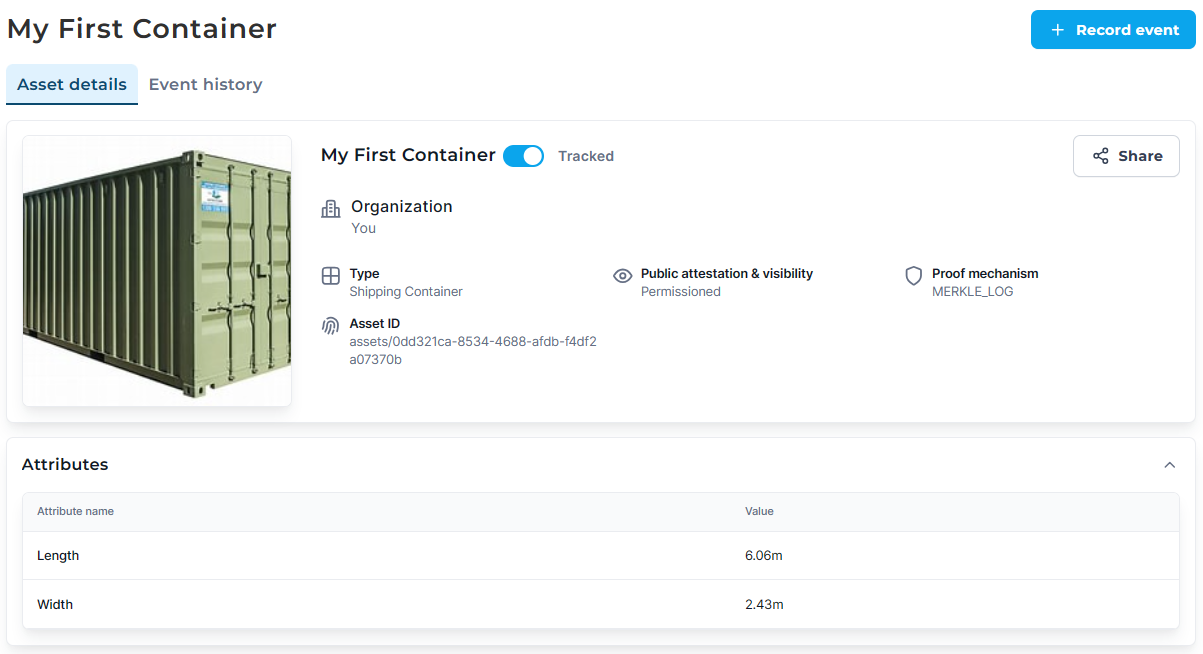
Mandy's view as an Administrator of the External Organization 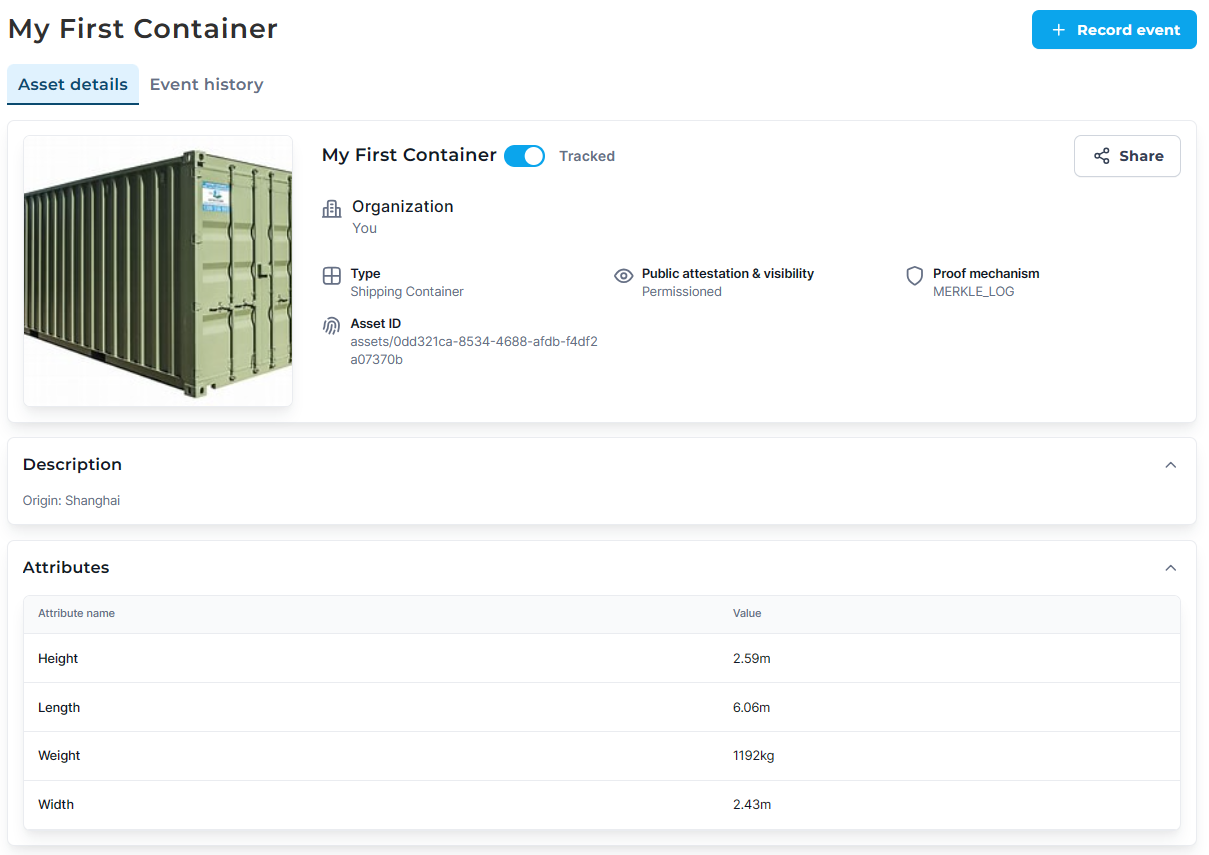
Jill's view as an Administrator If Mandy wishes to share what she can to Non-Administrators within her organization, it is her responsibility to create an ABAC Policy as she would any other Asset she has access to.
There are many possible fine-grained controls and as such ABAC and OBAC Policy Creation is an extensive topic. To find out more, head over to the IAM Policies API Reference.