Creating an Asset
Creating your first Asset
An Asset can be anything: a file (a document, an image, a sound file etc.), a software application, a shipping container, or even a physical product. It can be any digital or physical object with an associated name, description, and attributes.
Each Asset will have a history of any actions performed upon it by any actor.
You may share Assets and their history with specific stakeholders using permission sharing. DataTrails also enables you to publicly attest the provenance of your Assets. To learn how, see Public Attestation.
The creation of an Asset is the first Event in its lifecycle. The following steps will guide you in creating your first Asset.
Note: Please refer to Core Concepts for more information on Assets.
Creating an Asset
Create your Asset
Using the sidebar, select
Assets & Documentsand thenRegister Asset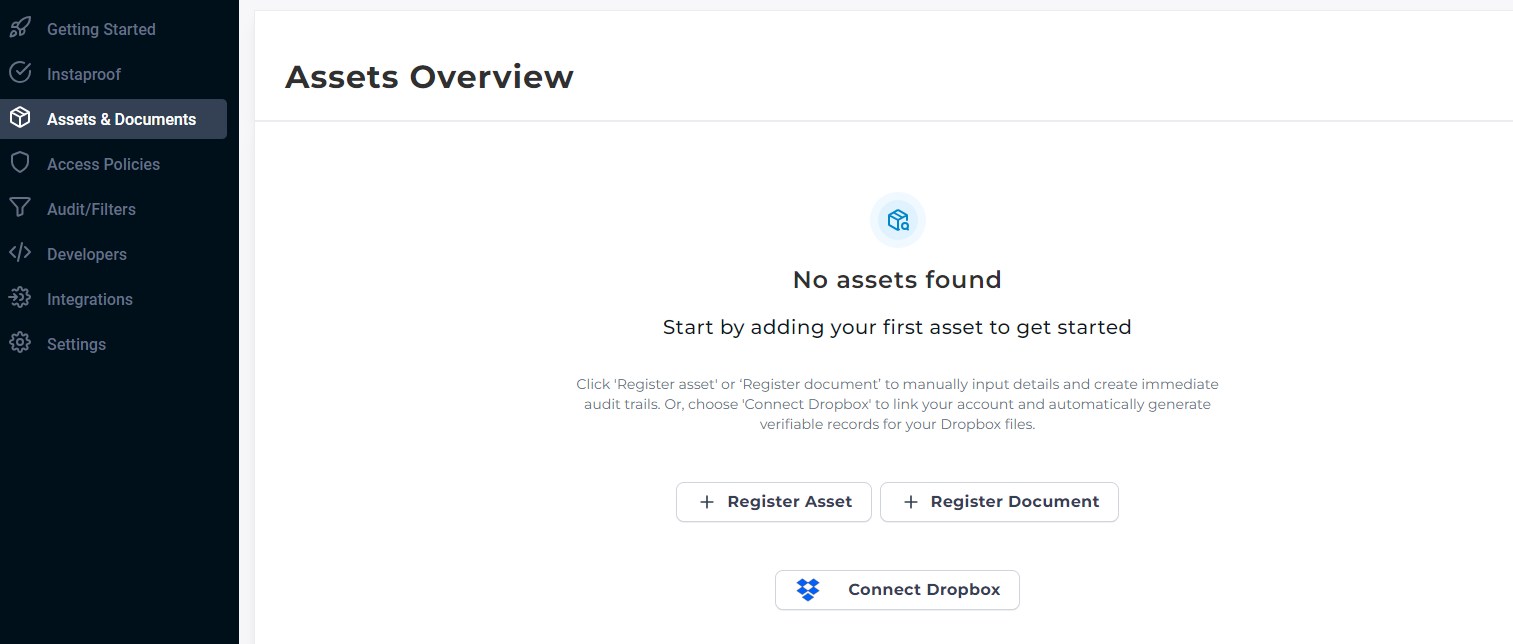
Adding an Asset
The DataTrails YAML runner is executed as a series of steps, each step representing a single operation with an `action`.Note: To use the YAML Runner you will need to install thedatatrails-archivistpython package.Click here for installation instructions.
In order to create an Asset we use the action
ASSETS_CREATE_IF_NOT_EXISTS.--- steps: - step: action: ASSETS_CREATE_IF_NOT_EXISTSCreate an empty file, in later steps we will add the correct JSON.
{ }Add details to your new Asset.
You will see an Asset Creation form, where you provide details of your new Asset:
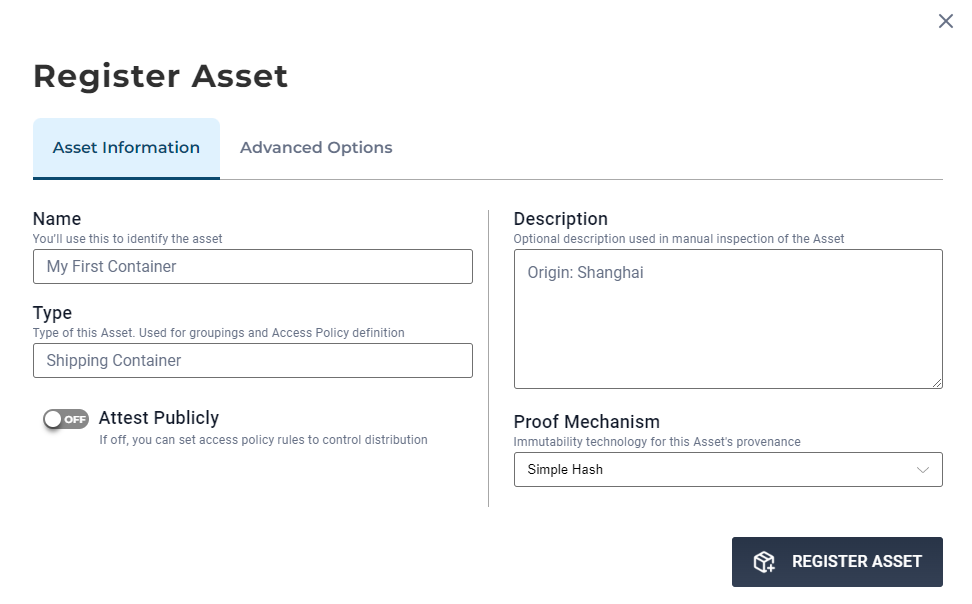
Here you can fill out some more metadata about your asset:
selectoris the identifying attribute the yaml runner will use to check if your Asset exists already before attempting to create it. In this case, we usearc_display_namewhich represents the name of the Asset.behavioursdetail what class of events in your Asset’s lifecycle you might wish to record;RecordEvidenceis the standard and recommended behavior for all Assets.
---
steps:
  - step:
      action: ASSETS_CREATE_IF_NOT_EXISTS
description: Create an asset.
asset_label: My First Container
selector:
- attributes:
- arc_display_name
behaviours:
- RecordEvidence
In the file you created earlier, begin adding metadata for your Asset:
behavioursdetail what class of events in your Asset’s lifecycle you might wish to record;RecordEvidenceis the standard and recommended behavior for all Assets.
{
"behaviours": ["RecordEvidence"]
}
As a minimum, you will need to add an Asset Name and Asset Type to create an Asset:
Asset Name- This is the unique name of the Asset i.e. ‘My First Container’.Asset Type- This is the class of the object; while it is arbitrary, it is best to have consistency amongst the type of Assets you use i.e. if it is a shipping container, the type could beShipping Container, which will then be pre-populated for future Assets to use as their own types.Adding Asset Details The YAML Runner uses the reserved attributes
arc_display_nameandarc_display_typeto representAsset NameandAsset Typerespectively.--- steps: - step: action: ASSETS_CREATE_IF_NOT_EXISTS description: Create an asset. asset_label: My First Container selector: - attributes: - arc_display_name behaviours: - RecordEvidence attributes: arc_display_name: My First Container arc_display_type: Shipping ContainerThe DataTrails API uses the reserved attributes
arc_display_nameandarc_display_typeto representAsset NameandAsset Typerespectively.{ "behaviours": ["RecordEvidence"], "attributes": { "arc_display_name": "My First Container", "arc_display_type": "Shipping Container" } }
At this point, you may wish to use the
Advanced Optionstab to add other details to your Asset, including extended attributes or attachments such as PDFs or Thumbnail Images.Extended attributes are user-defined and can be added to each unique Asset.
Not all Assets of a specific type need to have the same extended attributes, but in most cases it is better to do so for consistency.
To add a new attribute to an Asset, enter your key-value pair.
For Example:
Select
Add Attribute, and add your key-value pairs.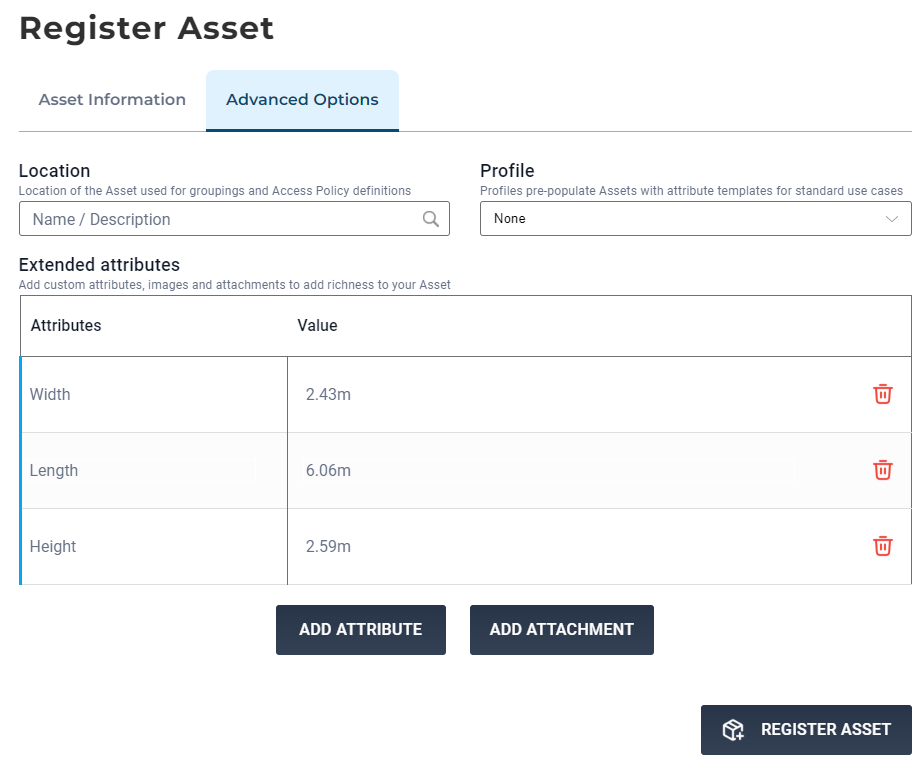
Asset Extended Attributes Extended attributes are custom key-value pairs, such as
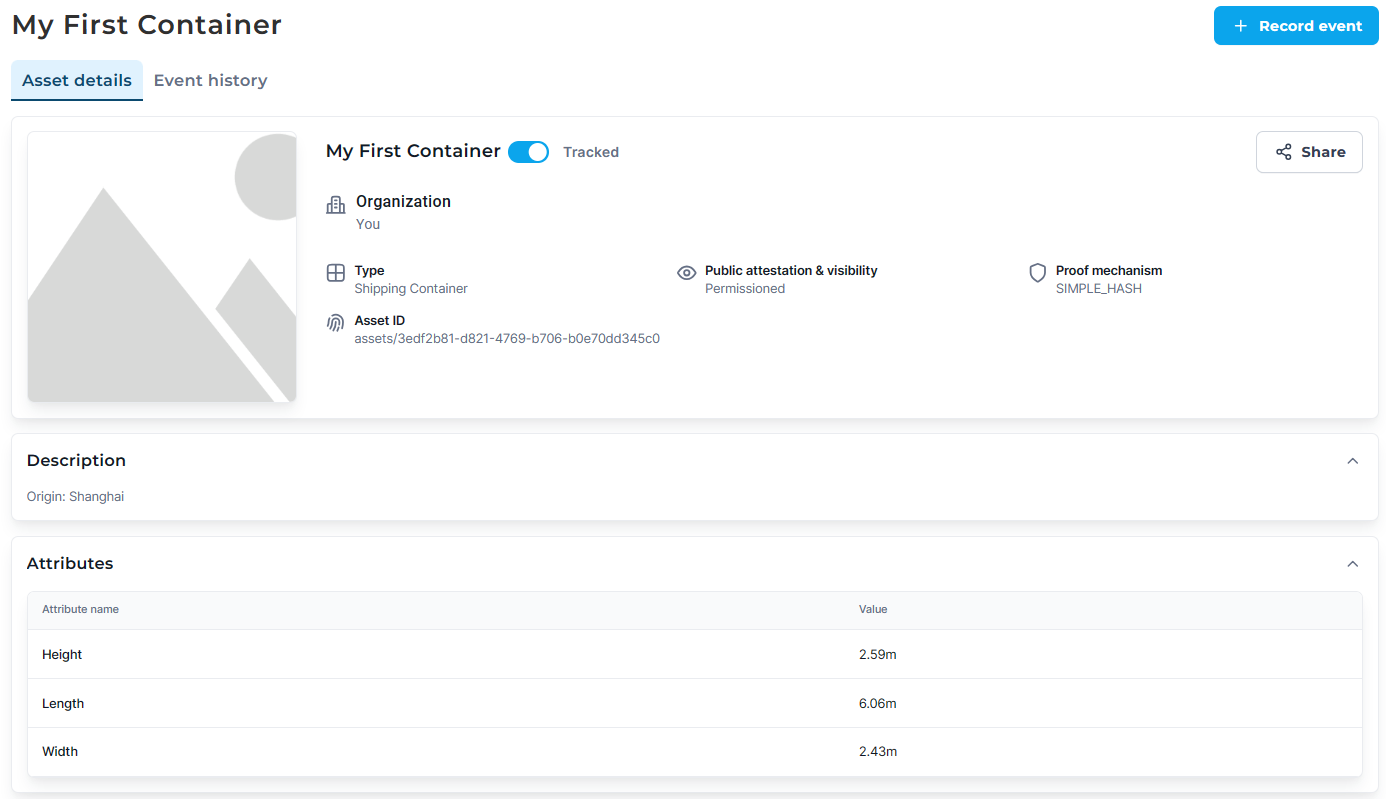
Width,Length, andHeightyou see below.This example also adds a location to our asset. To find out more about locations, click here.
--- steps: - step: action: ASSETS_CREATE_IF_NOT_EXISTS description: Create an asset. asset_label: My First Container selector: - attributes: - arc_display_name behaviours: - RecordEvidence attributes: arc_display_name: My First Container arc_display_type: Shipping Container arc_description: Originally shipped from Shanghai Width: "2.43m" Length: "6.06m" Height: "2.59m" location: selector: - display_name display_name: Parkside Junction description: Box intersection between Mill Road and East Road latitude: 52.2025 longitude: 0.1311 confirm: falseExtended attributes are custom key-value pairs, such as
Width,Length, andHeightyou see below.This example also adds a location to our Asset. To find out more about locations and how to find your Location ID, click here.
{
    "behaviours": ["RecordEvidence"],
    "attributes": {
        "arc_display_name": "My First Container",
        "arc_display_type": "Shipping Container",
        "arc_description": "Originally shipped from Shanghai",
        "Width": "2.43m",
        "Length": "6.06m",
        "Height": "2.59m",
        "arc_home_location_identity": "locations/<location-id>"
    }
}
Complete your Asset creation
Click
Register Asset
Create the Asset Use the archivist_runner command to run your YAML file!
$ archivist_runner \
      -u https://app.datatrails.ai \
      --client-id <your-client-id> \
      --client-secret client_secret.txt \
      my_first_container.yaml
Use the curl command to run your JSON file! See instructions for creating your
BEARER_TOKEN_FILEhere.curl -v -X POST \ -H "@$HOME/.datatrails/bearer-token.txt" \ -H "Content-type: application/json" \ -d "@/path/to/jsonfile" \ https://app.datatrails.ai/archivist/v2/assetsView your Assets
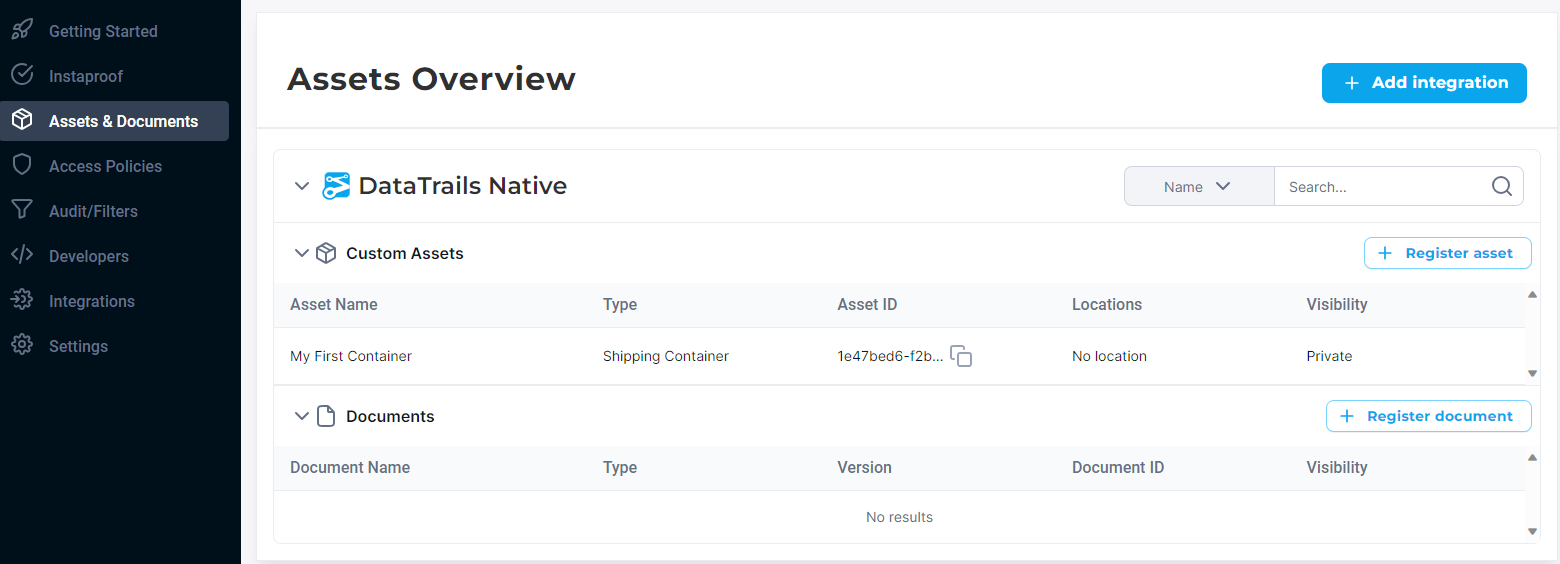
Navigate to ‘Assets & Documents’ to see your Asset in the UI.
Managing Assets You can view all Asset data using the
ASSETS_LISTaction. Use theprint_responsekeyword to get the full output.--- steps: - step: action: ASSETS_LIST description: List all assets. print_response: trueYou can view all Asset data using the following command.
curl -v -X GET \
     -H "@$HOME/.datatrails/bearer-token.txt" \
     https://app.datatrails.ai/archivist/v2/assets
View details of the Asset you created
Here we see all details entered: The extended attributes and a history of Events recorded on the Asset.To view your Asset, click on the Asset row. You will see the detailed history of your Asset.
Viewing an Asset The
ASSETS_LISTaction can be filtered using identifying attributes (attrs) to view the details of a specific Asset.--- steps: - step: action: ASSETS_LIST description: Display Asset named My First Container. print_response: true attrs: arc_display_name: My First ContainerDetails of a specific asset can be retrieved using identifying attributes (
attrs), such as name, type, or presence of a certain field.curl -g -v -X GET \ -H "@$HOME/.datatrails/bearer-token.txt" \ https://app.datatrails.ai/archivist/v2/assets?attributes.arc_display_name=My%20First%20Container
The first Event will always be the Asset Creation. In the next section, we will cover how to create your own Events for your Asset.Note: After registration, Assets cannot be updated using the asset creation screens but an Asset’s
Asset Attributescan be updated as part of an Event.For more information on creating Events, click here.